
Hobby
Hobby
RCM Audio Guides: Practical Resources for High-End Audio Enthusiasts.
guides
presentations
interesting facts
Calibrating a Phono Cartridge
Not too long ago, a good friend of mine—a man who’s always searching for the perfect sound—asked me for advice. He was having trouble finding the right preamp to pair with the cartridge on his turntable. He said he’d already tried several units, but none of them seemed to work well with it. Without asking for details, I made an appointment. When I saw the turntable, preamp, and cartridge, I got a little carried away for a moment and thought my friend was playing some kind of joke on me. This can’t sound bad! It wasn’t about the manufacturers’ reputation at all; I simply knew this equipment and was certain of its quality. A faulty setup was also out of the question; listening to a CD confirmed that everything was in order on that front. All that remained was the signal path from the analog source. The interface settings between the cartridge and the preamp were correct; the only thing left was the cartridge itself. I took a closer look at it and… eureka! It turned out that the tracking angle was set incorrectly. When I asked how he had calibrated it, my friend replied that he had leveled the turntable, adjusted the tracking force, and set the anti-skating. He was convinced that he had done everything possible at that point, but unfortunately, he was very much mistaken. It took me some time and effort to realize the importance of calibrating the cartridge, but the result was worth it—all the problems with the turntable were gone. This whole situation made me realize the need to describe this process, as I haven’t yet come across any article in the Polish press that takes this topic seriously. As much as possible, I’ll focus solely on the practical aspects of calibration in this text. Theoretical concepts related to turntables will be used only when necessary to understand how a specific component of the system works.In my descriptions of the sound achieved during the setup process, I have deliberately omitted the impact of the electrical matching between the cartridge and the phono preamp, as this is a topic best addressed in a separate article. At the same time, I would like to note that it is very rare to find turntables on which it is possible to perform all of the adjustments mentioned. However, even a single, properly executed step will result in a noticeable improvement in the turntable’s performance. If the manufacturer did not intend for any of the operations described below to be performed, it’s best not to force the issue. The turntable tonearm, despite its rigidity, is a very precise mechanism that can be damaged quite easily. And let’s not even mention the cartridge…Focusing on the cartridge, I assumed that the turntable was properly leveled and mounted on a sturdy, vibration-dampening base. Without this, our work has no chance of success. And one more crucial point: the text mentions calibrating the cartridge and tonearm, but this is not a very precise term, since our goal will be to find the optimal operating point for the stylus, which, for obvious reasons, cannot be adjusted manually.
1. Installing the insert.
Despite the apparent simplicity of this procedure, it must not be taken lightly. I am aware of cases where the insert or the arm head was damaged during assembly. Special attention must be paid to the force used to tighten the mounting screws. If you intend to proceed with the subsequent calibration steps, tighten the screws so that the insert can be moved within the head when light pressure is applied to it. This applies only to arms with heads featuring milled guide-shaped slots along which the insert can be slid. Owners of arms with pre-drilled holes can immediately tighten the screws “as far as they will go,” which means applying just enough force to ensure a secure lock in the head without stripping the thread. This is particularly important for inserts with threaded holes, which are practically unusable if the thread is damaged. Of course, you could drill out such a hole, but I’d rather not even think about that scenario. Be sure to tighten the screws using a small screwdriver or an Allen wrench, which is often included with the insert. If you don’t have such a small tool, keep in mind that the larger the tool, the less force you should apply to it. As I mentioned, inserts may have their own threads, but most have only special grooves for the screws, which are secured with nuts.
2. Wire Installation
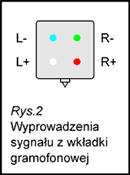
Rule number one: Never touch the connectors with your fingers. At this stage, you should also exercise extreme caution—applying too much force can damage the module or break the signal wires. The connectors of the individual signal wires should be plugged into their corresponding pins located on the back of the module. How do you know which wires correspond to which pins? It’s very simple: they are color-coded as follows: red for the right positive, white for the left positive, green for the right negative, and blue for the left negative (Fig. 2). It’s best to use a small pair of tweezers to attach the connectors. If you have trouble sliding the connectors all the way onto the pins, you can try gently pressing them down with our mini screwdriver. But be careful—don’t overdo it! The pins on some inserts have special grooves that, together with the connector, form a latch mechanism that you can easily feel when it “clicks” into place. It’s possible that the connectors will still be loose after installation. This situation is much worse than when we manage to slide it on only partially but tightly. In a loose connection, the material will begin to oxidize more quickly, which will significantly degrade signal transmission—which is already very weak in the case of phono cartridges. It’s best to remove the loose connectors and gently squeeze them with pliers, then try reassembling them. At this point, we’ve completed the main mechanical part of the cartridge installation. Inquisitive readers will likely ask whether it’s possible to reverse the order of installation—by connecting the cables first and then installing the cartridge. Of course it is; sometimes it’s even easier to plug in the connectors while holding the cartridge between your fingers. On the other hand, with this approach, it’s much easier to damage the cables connecting the cartridge to the tonearm.
4. Setting the Tracking Force
This is a basic adjustment that must be made before you start using the turntable. During this adjustment, pay the most attention to the stylus, which is susceptible to damage. The force with which the stylus contacts the record’s surface plays a decisive role in preserving the longevity of your vinyl collection. It also has a huge impact on the amount and quality of information read from the record. Contrary to popular belief, I would like to point out that setting the tracking force too low has a much more detrimental effect on the condition of the record than slightly overloading it. I am referring here to operation within the tolerance range specified by the cartridge manufacturer. This is because an underloaded stylus tends to lift off the record’s surface, especially in sections with a high concentration of high frequencies (densely packed grooves). Such uncontrolled movement of the stylus is a real disaster for the record’s surface, where the width of a single groove is 45 mm. Of course, this matters if we consider the issue on the microdynamic scale, which is, after all, what we all care about. It’s best to adjust the tracking force using a special scale designed for this purpose. If you don’t have such a device, there’s another way to handle it, provided that the counterweight mounted on the tonearm has a marked tracking force scale. First, remove the needle guard from the cartridge, unless it is an integral part of it. Next, disconnect the anti-skating mechanism, unlock the tonearm, and, by turning the counterweight, adjust it so that it is perfectly parallel to the surface of the platter. The counterweight disc has a rotating ring with a scale marked in grams. While holding the counterweight in place, rotate the ring until the zero symbol aligns with the mark on the tonearm. If everything went according to the instructions, all you need to do now is turn the counterweight until the stylus pressure reaches the value specified by the manufacturer. Unfortunately, this method is subject to some error (but what can you do without a scale?), and it can only be safely used with popular MM cartridges. Owners of high-end MC and MM systems won’t get very far without a good scale. The set tracking force should always fall within the upper half of the permissible range.
4. Antyskating
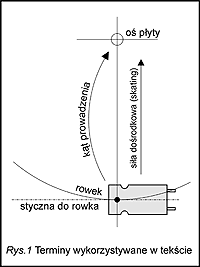
When using turntables equipped with a single-point-supported tonearm, it is important to remember to compensate for the centripetal force (Fig. 1) acting on the stylus as it moves along the record groove. The force that pulls the stylus toward the center of the record is called “scating” in English. Counteracting this force is called “antiscating.” I have taken the liberty of slightly adapting this term to Polish, and I will use it in the forms “skating” and “antyskating.” There are several ways to adjust it, ranging from a simple weight attached to a string to complex magnetic systems that literally compensate for themselves (the point is that no traditional system operates uniformly across the entire operating range of the tonearm). Most turntable users set the anti-skating literally “by eye,” blindly trusting what the tonearm manufacturer wrote in the included manual. I can say at this point that if the anti-skating on your turntable is set according to the principle that its force depends on the set tracking force, then in 9 out of 10 cases you’ll need to adjust it. How do you do that? First, forget about the relationship between tracking force and centripetal force. Now you need to find a record with as little music on it as possible… This is no joke—a record like this (specifically, one side of it) has a long run-out to its inner groove. We’ll use the area where there’s no longer any recorded music for our own purposes. Simply lower the needle onto the record’s surface between the tracking grooves, where it’s smooth, and observe how it behaves. If the tonearm “drifts” toward the center of the record, this indicates that the anti-skating compensation is too low.In the opposite situation, when the tonearm drifts outward, this force should be reduced. The ideal situation occurs when the stylus waits for “its” groove. This is probably the only practical method for determining the correct anti-skating force. As usual, instruments have been designed to measure centripetal force, but the method described above can successfully replace them.
5. VTA – Vertical Tracking Angle
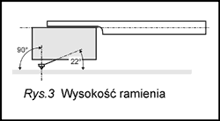
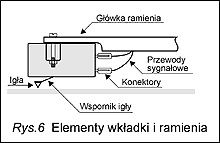
When cutting grooves in the master disc (the so-called lacquer disc), the stylus is positioned perpendicular to the disc’s surface. In all playback systems, it is mounted on a cantilever that connects to the cartridge at a 22-degree angle (Figs. 3 and 6). By adjusting the height of the tonearm, we can position the stylus perpendicular to the surface of the record. Assuming that the bottom of the headshell is an extension of the tonearm’s axis, simply align it parallel to the surface of the record (not the platter!!!). To begin the calibration, start by loosening the screw that secures the arm to the yoke so that it is locked in place by only about one turn. This applies only to arms not equipped with a continuous height adjustment mechanism. Now lower the stylus onto the turntable and, in this position, check whether the arm is perfectly parallel to the surface of the turntable. If it is not, make the necessary adjustment. Use the lift to raise the stylus, and while holding the tonearm near the yoke, loosen the locking screw. Depending on the adjustment needed, gently raise or lower the arm shaft and lightly tighten the mounting screw. Check that the alignment is correct and, if necessary, repeat the entire procedure. If everything is in order, we can consider the first part of the arm height adjustment complete. In addition to the term “VTA” used above, there is also the concept of “SRA” (Stylus Rake Angle), which omits the topic of stylus arm adjustment and focuses directly on the angle between the stylus and the record surface. Since both terms refer to adjustments that share a common goal, I have taken the liberty of using the term that is more commonly used in publications.
6. Tangency Adjustment, Guidance Angle (Tangency)
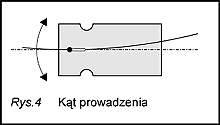
During record playback, the cutting head is positioned so that it is tangent to (parallel with) the grooves (Fig. 4). In turntables with a pivoting tonearm, the stylus does not move in a straight line along the radius of the record, but rather in an arc. To bring the path of movement as close as possible to the tangent of the groove, an appropriate adjustment is made. This involves aligning the cantilever parallel to the groove at two precisely defined points on the record, known as the Baerwald points. Since we cannot adjust the needle itself, we will have to adjust the entire insert. Because its position must be corrected manually, this task is difficult to control and requires patience. Thanks to the template available on our website, each of you will be able to perform this adjustment on your own. There are several possible scenarios, depending on the insert’s design:
- If the front surface of the insert is large enough and perpendicular to the axis of the needle support, you can make the process easier by attaching a graphite refill from a mechanical pencil to it using a piece of adhesive tape and checking the calibration against the horizontal lines on the template.
- Owners of inserts whose side edges are parallel to the needle support axis can use the vertical guide lines on the template to determine the correct angle.
- If none of the methods described above are feasible, we can try to set the guide angle using the needle support as our reference point.
- This is the most difficult solution to implement, but sometimes it is the only one.
- It requires a great deal of patience and precision.
- It may be somewhat easier to use a flashlight or a powerful LED, which you position along the axis of the line marking the tangent to the “SA” groove.
- The beam of light directed at the bracket will cast a shadow behind it; when this shadow falls on the line, it will help you make the correct adjustment.
Owners of inserts whose side edges are parallel to the axis of the needle support can use the vertical guide lines on the template to determine the correct angle.
If none of the methods listed above are feasible, our only option is to try setting the guide angle using the needle bracket as our reference point. This is the most difficult solution to implement, but sometimes it is the only one. It requires a great deal of patience and precision. It may be somewhat easier to use a flashlight or a powerful LED, which we position along the axis of the line marking the tangent to the “SA” groove. A beam of light directed at the bracket will cast a shadow behind it; when this shadow falls on the line, it will help us make the proper adjustment.
To adjust the guide angle, start by placing the template on the plate’s axis. Next, unlock the arm and lower the needle at the point marked “A.” The grid of lines on the template will help us determine the correct position of the insert. Keep in mind that to protect the needle from accidental damage, you must adjust the position of the insert only after lifting the arm upward. Once the insert is in the correct position, repeat these steps after placing the needle on the template at point “B.” After making the adjustment, return the needle to point “A” and check everything again. If everything is in order, you can move on to the next step. Owners of turntables that come with a template for setting the tracking angle should use that template first. If you’re unable to make the proper adjustment (it does happen!), you can try using our template. Unfortunately, some manufacturers—especially in the entry-level models of their turntables—simplify their designs by deviating from strictly defined principles and using their own solutions, which make it impossible to align the stylus according to Baerwald’s points.
7.Azimuth
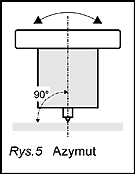
Often, when playing analog records, you can sense an uneven distribution of musical accents between the channels, which occurs even with monaural records. Most often, the anti-skating circuit is blamed entirely for this situation. But what if it’s set perfectly, and our soundstage still seems to wander around the room? The problem to be addressed—much like when adjusting the tonearm height—is an incorrect angle between the stylus and the record’s surface. The difference lies in the axis relative to which it should be aligned. In this case, it is the axis formed by the tangent to the groove. Simply put, the stylus should be aligned so that, when viewed from the front of the cartridge, it is perpendicular to the surface of the record (Fig. 5). If the stylus is not perpendicular to the vertical, it will cause an unbalanced signal level between the channels at the cartridge’s output. Checking and adjusting the azimuth shouldn’t pose any major problems—provided, of course, that the tonearm manufacturer has made this adjustment possible. At this point, I’d like to warn all users of turntables with tonearms that lack this adjustment feature that there is no proven method for making a controlled azimuth adjustment; however, this does not mean that the adjustment cannot be made at all. The simplest method is to place thin strips of tape under one of the screws (in this case, the insert will not be perfectly parallel to the surface of the tonearm head), but you need to be aware of the challenge: this method is intended only for the most persistent. Keep in mind that using too much tape (or washers) will negatively affect the tonearm’s effective mass and may also introduce unwanted resonances between the headshell surface and the cartridge. When installing shims between the cartridge and the headshell, you’ll need to readjust the tracking angle (step 6) and set the tracking force (step 3). Another option is to install shims between the tonearm base and the turntable housing. However, this method requires modifying the turntable’s design, which isn’t always possible. Additionally, there may be some difficulties in setting the correct antiskating value. The most precise method for setting the azimuth is probably to use a special test plate, but I’ve chosen not to devote much attention to it, since very few of our readers likely have access to such a plate. Another method involves using a monaural recording, a specially prepared cable, and an amplifier equipped with a “mono” mode. There are also people who successfully use an oscilloscope, but even in this case, a special test disc is required.
If you have a turntable that allows you to adjust the azimuth, it’s best to use the age-old analog method, which involves placing the tonearm with the cartridge on a mirror set on the platter and visually checking the stylus. The mirror makes it easier to spot any potential deviation, which is usually very slight. Generally speaking, the “mirror method” does not allow for precise azimuth adjustment. Sometimes you can get it just right, but experience shows that these are rare exceptions.
Final Adjustments
At this point, you can complete the adjustment process. However, a properly performed calibration should be given a final “polish,” which should be carried out during normal use of the turntable. This involves adjusting the stylus tracking force, tonearm height, and azimuth to achieve the most balanced sound. Since this stage is all about tailoring the experience to the user’s individual preferences, there is no objective formula for this process. Based on my own experience, I can only offer a few suggestions that might be helpful:
- Every adjustment requires a great deal of patience on the user’s part.
- To maintain full control over this process, changes should be made in small increments so that, if the sound quality deteriorates, you can revert to the previous setting.
- Do not force adjustments.
- If the changes do not produce the desired results, it means that the specific system has already reached its maximum potential.
- Keep in mind that the final result depends on the quality of the turntable, tonearm, and cartridge you are using.
- If the turntable tonearm does not come with factory-installed azimuth or height adjustment capabilities, it is best to leave these settings as they were established during the initial setup.
- The inability to make controlled adjustments to these parameters will cause the previously set values to become misaligned.
- On the bright side, you can still adjust the tracking force, which can be set on any turntable.
- If the sound is too sharp and bright, and the midrange frequencies are exaggerated, try lowering the tonearm height.
- A sound that is bass-heavy, with reduced treble, indicates that the tonearm is set too low.
- A harsh sound suggests that the tracking force is too low.
- A muffled sound is a sign that the stylus is pressing too hard against the record’s surface.
- As you can see, the differences in the perception of distortion caused by an incorrect tonearm height or improper needle pressure are very slight, which makes it necessary to experiment further with these parameters.
- When adjusting the tonearm height, you should also take into account the thickness of the record on which the adjustment is being made.
- Differences in record thickness among records from different manufacturers can be as much as 1 mm.
- I know people who adjust the tonearm height individually for each record! You should never exceed the maximum tracking force specified by the cartridge manufacturer.
- Distortion or one channel playing louder than the other is usually caused by an incorrectly set anti-skating force.
- A shift in the soundstage toward one of the channels is caused by an incorrectly set azimuth.
- W tym punkcie muszę wyjaśnić różnicę w postrzeganiu zakłóceń pochodzących od antyskatingu i azymutu.
- The mechanism behind both types of distortion is similar; the main difference lies in their scale.
- If we assume that anti-skating operates on whole numbers, then the azimuth should be expressed in hundredths of those values.
- Looking at both factors in this way will help us understand their impact on the sound of our turntable.
- If we are dealing with a noticeable shift of the soundstage toward one of the channels, the solution should likely be found in adjusting the anti-skating system.
- However, if you notice an uneven distribution of sonic details and nuances between the channels, you need to take a closer look at the azimuth.
- Of course, even with perfectly adjusted anti-skating, there may be instances where the azimuth causes the soundstage to shift, but such cases are very rare.
- Be sure to check the condition of the stylus.
- This applies to users who have performed the calibration process on a used cartridge.
Don’t try to force adjustments. If the changes don’t produce the desired results, it means that the system has already reached its maximum potential. Keep in mind that the final result depends on the quality of the turntable, tonearm, and cartridge you’re using.
If the turntable tonearm does not come with factory-installed azimuth or height adjustment, it is best to leave these settings as they were established during the earlier adjustment phase. The inability to adjust these parameters in a controlled manner will cause the previously set values to become misaligned. On the bright side, you can adjust the tracking force on any turntable.
If the sound is too sharp and bright, and the midrange frequencies are exaggerated, try lowering the height of the tonearm.
A sound that is bass-heavy, with reduced treble, indicates that the tonearm height is set too low.
A sharp sound suggests that the needle pressure is too low. A muffled sound indicates that the stylus is pressing too hard against the record’s surface. As you can see, the differences in how distortion resulting from improper tonearm height or stylus pressure is perceived are very subtle, which makes it necessary to experiment further with these parameters.
When adjusting the tonearm height, you should also take into account the thickness of the record on which the adjustment is being made.Differences in the thickness of records from different manufacturers can be as much as 1 mm. I know people who adjust the tonearm height individually for each record!
Never exceed the maximum tracking force specified by the cartridge manufacturer.
Distortion or one channel playing louder than the other is usually caused by an incorrectly set anti-skating force.
A shift in the soundstage toward one of the channels is caused by an incorrectly set azimuth. At this point, I must explain the difference in how distortions caused by anti-skating and azimuth are perceived. The mechanism behind both types of distortion is similar; the main difference lies in their magnitude. If we assume that anti-skating operates on whole numbers, then the azimuth should be expressed in hundredths of those values. Looking at both factors in this way will help us understand their impact on the sound of our turntable. If there is a noticeable shift in the soundstage toward one of the channels, the solution likely lies in adjusting the anti-skating system. However, if there appears to be an uneven distribution of details and sonic nuances between the channels, you’ll need to take a closer look at the azimuth. Of course, even with perfectly adjusted anti-skating, there may be situations where the azimuth causes the soundstage to shift, but such cases are very rare.
Be sure to check the condition of the stylus. This applies to users who have performed the calibration process on a used cartridge.
From the tips presented above, one can conclude that the number of possible combinations is infinite (the greatest advantage of analog technology) and that a perfectly tuned turntable is pure fantasy. Of course, there is that one “ideal” configuration, but it’s only a theory. Every user wants to tailor the sound to their individual preferences, and that should be the goal of our efforts. I hope that the advice provided here will help you make the most of your turntable’s capabilities.
Template for setting the angle of contact
Author: Robert Rolof